


Fingerpicking Guitar Techniques
Arichive : Fingerpicking Guitar Techniques
The pick can be a guitarist’s best friend. It’s small, easy to get your fingers around and awesome at producing a clear, crisp tone. Most guitarists will end up using a pick at some stage, but on the off chance you find yourself without one, it can be good to know what to do. For this article, I will be focusing more on another technique known as fingerpicking.
Fingerpicking is a great technique to use if you find yourself without a pick, or if you don’t like using one. The best way to learn about it is to try it out.
Take a look at the exercise below:
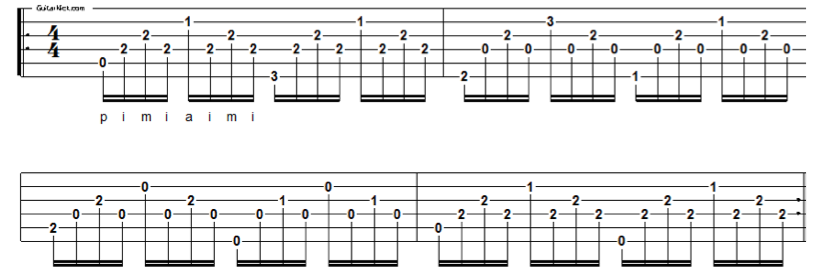
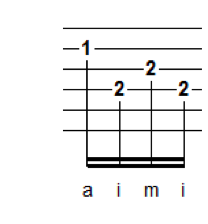
The PIMA Formation
So in the above example, you can see the letters ‘p i m i a i m i’ arranged under the first eight notes. This is your fingerpicking
pattern. Basically, ‘p’ refers to the thumb on your picking hand, ‘i’ refers to your index finger, ‘m’ is your middle finger, and ‘a’ is your ring finger. Like this:

A good way to familiarise yourself with the pima formation is to just practise saying the names of your fingers while plucking the open strings of your guitar.
- Use your thumb to pluck the 6th string- this is p.
- Then use your index finger (i) for the 5th string
- Your middle (m) for the 4th
- And your ring finger (a) for the 3rd string.
Repeat this as many times as you need until the names of your fingers start to feel more familiar.
So, if we take a closer look now at the first eight notes from the example above, we see that your left hand is holding a basic A minor chord formation. Your right hand then follows the pattern ‘p i m i a i m i.’ If you’re not familiar with this chord or tablature, don’t worry, I break the exercises down fully below.

FINGERPICKING EXERCISE – STEP 1
- The p listed under the 0 means you pluck the open A string with your thumb.
- Then, use your index finger to play the E note (2nd fret, D string)
- Your middle finger then plays the next A note (2nd fret, G string)
- Then you use your middle finger again to pluck the E note (2nd fret, D string)
FINGERPICKING EXERCISE – STEP 2
 Using your ring finger this time, play the C note (1st fret, B string)
- This is followed by another E note (2nd fret, D string), which is again plucked by your index finger.
- Then your middle finger plays the A again (2nd fret, G string)
- And finally, you return to the E (2nd fret, D string), plucking with your index finger
It might feel like your fingers are tripping over themselves at first. But just repeat this fingerpicking pattern using the first eight notes of the exercise for as long as you need. Once you start to feel comfortable and confident with this picking pattern, move on to the next eight notes. Remember, the picking pattern stays the same throughout the exercise, even though the notes are changing slightly.
There you go! Now try applying this picking pattern to some of the songs you already know. If it seems difficult at first, try not to get frustrated. It’s like when you learn a new chord- at first your fingers might feel awkward or uncomfortable but the more you play, the more natural it’ll feel. Fingerpicking is its own technique so it’ll take practise to become proficient at it. Rest assured that once you get the hang of it, you’ll open up a whole new set of ways to expand your playing.
Still confused? Check out this video we found for more tips and tricks on how to master the fingerpicking technique!


Reviews
There are no reviews yet.