Gila Rayberg – Picassiette Portraiture
 Salepage : Gila Rayberg – Picassiette Portraiture
Arichive : Gila Rayberg – Picassiette Portraiture
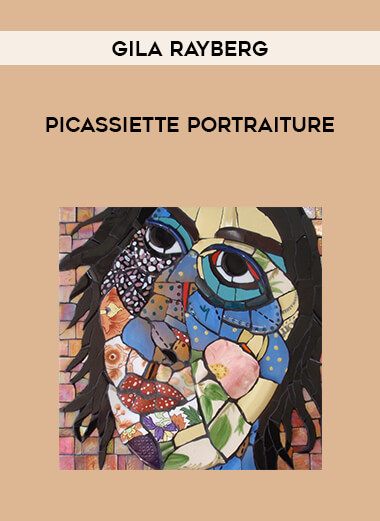
In this online course, award winning mosaic artist Gila Rayberg shares her unique style and methods for creating picassiette portraits. She breaks down the process from beginning to end and demonstrates by using all types of broken china, crockery, pottery, and other found objects. She shares all of her tips and tricks while completing a picassiette portrait throughout this course.
Gila starts by explaining what the best choice is for choosing a reference photo, and what to look for to get the best results. She then demonstrates how to transfer the design to the substrate and shows how to easily paint on a grey scale of values and highlights. This method makes it easier to choose the right colors of the tesserae (materials).
Gila also gives students a “virtual tour” of all the different plates, cups, and other materials she had to choose from at the Mosaic Arts Online headquarters. After choosing the materials Gila returns to the studio ready to teach her techniques for creating these incredible and unique picassiette portraits. Gila demonstrates how to work with different levels and thicknesses of materials, and how to leave the proper amount of space for grout lines which create the outline of the images. There is even close-up detailed footage for creating eyes using stained glass.
Never before has Gila shared her process from start to finish on film. This course has over three and a half hours of footage from an “over-hands” perspective. Gila completes her portrait and leaves nothing to mystery as she answers all of your questions while she works.
After Gila has walked through the mosaic process, she shares how she chooses her grout color and demonstrates how she uses grout to complete her portraits.
Once you have completed this course you will be able to continue creating picassiette portraits of humans or animals over and over again.
Your Instructor
Gila Rayberg
Gila Rayberg arrived at the visual arts after a successful career as a freelance musician and educator. Allowing her strong sense of intuition and love of experimentation to guide her, Gila has developed a unique voice in the realm of mosaic portraiture.
After earning her masters degree in music from Arizona State University (1989), Gila moved to San Francisco and quickly became involved with a community of improvisational musicians, composers and artists.
Pursuing her love of travel, Gila found herself performing & teaching instrumental music at a newly established University in Borneo, East Malaysia. From there, she traveled extensively throughout South East Asia, Hong Kong, China, India, Israel & Egypt, collecting art, textiles, and musical instruments, representative of local cultures. With each excursion Gila became increasingly fascinated by the indigenous art which surrounded her.
On her return to the United States, Gila landed in New Orleans, spending her first year practicing jazz standards on the street for tips. She then joined the horn section of Deacon John & the Ivories which kept her gigging steadily until hurricane Katrina hit in 2005. At that point, Gila turned her focus to creating mosaic art full time.
In recent years, Gila’s work has been exhibited around the US, winning numerous awards for her expressive and whimsical portraits. Her work resides in private collections internationally & has been published in a number of books.
Course Curriculum
First Section
Start
Introduction and Personal Interview for Picassiette Portraiture with Gila Rayberg (6:40)
Start
Downloadable PDF of tools, materials and resources.
Start
How to pick your reference photo. (1:05)
Start
Choosing your substrate and tracing your reference photo. (3:52)
Start
Darken the lines of the traced reference photo. (2:00)
Start
How to add acrylic paints for the highlights, values and tones. (0:58)
Start
How to paint on the tones, values and highlights with black and white paint. (10:10)
Start
Introduction to the Tools. (2:18)
Start
Gila’s Towel Cutting Method. (1:58)
Start
Beginning to plan the mosaic. (1:07)
Start
Choosing the materials. (1:50)
Start
Cutting and placing the focal point piece. (4:35)
Start
How to mix the thinset. (2:13)
Start
Creating the eye. (8:39)
Start
Detailed up close of adhering the eye. (2:10)
Start
More up close details of cutting glass for the eyes. (0:46)
Start
Adding the white of the eye. (6:31)
Start
Shaping pieces to create the cheek. (6:54)
Start
Height differences and adhering the cheek. (2:55)
Start
Creating the nose. (8:35)
Start
Shaping the nostrils. (6:27)
Start
Creating eyebrows and filling in. (11:11)
Start
Filling in and building up levels of the tesserae. (11:18)
Start
How and when to clean the mosaic while working. (1:35)
Start
Making more choices and filling in. (10:29)
Start
How to create the lips. (8:12)
Start
How to create the ear. (7:13)
Start
Prepping hair strands. (4:13)
Start
How to adhere the hair. (10:00)
Start
Creating the shoulders. (12:59)
Start
Filling the face and finishing the hair. (10:34)
Start
Continuing to fill in the face. (10:24)
Start
Filling in the forehead. (11:31)
Start
How to fill in the neck. (10:18)
Start
Choosing the background and adhering it. (9:57)
Start
Choosing the grout color and how to mix it. (4:00)
Start
How to grout textures and different levels. (5:53)
Start
Buffing mosaic and wrap up. (7:35)









Reviews
There are no reviews yet.